Tuesday, October 9, 2012

...But there were just a few little things...


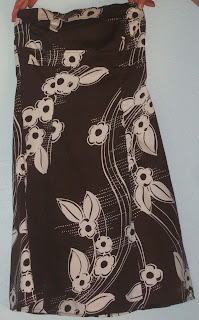
How many times have you gone shopping and found a dress that fit perfectly and was really cute, but there were just a few little things that kept it from working for you? Sometimes those 'few little things' are a pain to fix and so I put the dress, or whatever piece of clothing I'm looking at, right back down, but more often than not it's pretty easy to fix them. So, here is one of my dresses - it was long enough (which is often half the battle), it fit, wasn't low cut and it was pretty; however, it was very sleeveless - the straps even curved in - and the back was waaaaayyyyy too low.


So, in order to fix them I needed some fabric, but a different color would have looked weird - at least in my opinion - and the color was very difficult, might as well have been impossible, to match; however, the entire dress was lined - and the lining was the same exact color as the dress. It was a bit different in texture, but not enough that anyone would notice. So, I cut out the skirt lining because honestly, why would you line a skirt that isn't see-through? And so, now I had way more than enough fabric for my few alterations :)


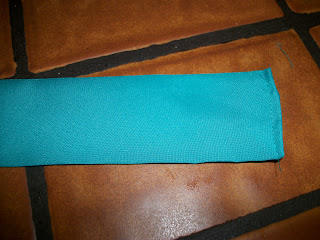
So, I decided to tackle the sleeveless thing first - I didn't want a regular go-all-the-way-around-the-arm sleeve, just a simple cap sleeve. The pattern piece for such a things looks about like the pieces I have cut out  below - the thickness is naturally determined by how long of a sleeve you want. So, I cut my sleeves out of the skirt lining...


Hemmed the bottom of the sleeves, and pinned it to the top half of the arm hole. In order to make it even, you find the middle of the sleeve and pin it to the shoulder seam on the dress and just pin down the sides.


Then you sew the two together, kind of tapering the beginning and end of the seam so that the sleeve and the armhole run together smoothly.


Now for the back of the dress. I could have just put a straight piece of fabric across the back, but that would have been rather boring, so I decided to do kind of a crossover thing on the back. What I did was take a really wide piece of fabric, folded it in half and cut it into two pieces. Then I tried the dress on and pinned the two pieces so that they fit me and were as high as I wanted. Once I pinned and measured them, I cut the pieces of fabric to the right size and finished the edges. Then I hand-sewed the tops of the pieces to lining of the dress, but not all the way down, so you can still get the dress on :)


 However, the bottom parts need to be held down also, so I hand-sewed hook & eyes to the corners of the inserts and the lining of the dress, so that the pieces will stay down, but can be taken up.


 So, now I had a dress without 'just a few little things' :)


Tuesday, August 7, 2012

Why modify something if you don't have to?

 You know, one way to make modest clothes in any color and in the right size is to sew from a sewing pattern. If you wait for a good sale, they only cost $1-2 and the variety of styles is amazing. I really like them because I can make my clothes fit me right, while store bought ones will often fit rather akwardly as I obviously am not who they had in mind when they designed them :) Here I had a McCalls pattern (6346), which have very nice, very detailed instructions! See, all you had to do was sew the gathered top - the bottom half was only two pieces, so very easy.


The only modifications I made to the pattern was gathering the neckline a little tighter than the pattern called for because I didn't like how low the back was and I added a ribbon tie because I thought it would look cuter :)

Thursday, July 12, 2012

Simple Alterations


So, I think this post needs a bit of explanation before I even start in on it because the dress is not immodest. My friend here picked out this dress, but it didn't quite fit her right and even though it's modest I decided to put it up here because sometimes one does find an outfit that could be made perfectly modest with a little simple alteration, which is what I did to this dress.


As you can see, the dress is a little large in some areas like the sides and the shoulders. I started with the shoulders. All you need to do to take in a seam is find where it has already been stitched and start there and go in however much you need and then go back to the original stitching line, so the stitch stays looking straight. I did the same thing to the sides, but my pics of it flopped, so you are stuck with the shoulder pic :(


However, sometimes you just can't get the sides to look just right. The easiest way to handle this is to make some ties. You need to cut a strip of fabric as long as you want the tie and just over twice the width. You fold the fabric in half longways and sew the long edge and one of the short edges.


The you turn the tie inside out and tuck in the unsewed edge.


Okay, so there are two main ways you can sew the ties to whatever. You can a) be super ambitious and open up the side seam, insert the tie and resew it or you can b) lay the tie over the side seam going towards the front and sew it down. Then when you flip it back, the tie looks like it was sewn in the side seam.


And here is her dress - fits a bit better huh? (not to mention that ties can really make a dress or shirt look waaayyy cuter :) ).

Wednesday, May 30, 2012

Fixing a low v-neckline


Okay, we have done one post on how to fix a low neckline, but there are many, many types of low necklines and so are many ways to fix them - and here is another idea I thought might help you as it did me.


This shirt is another one of my thrift store victims. I thought it was really cute and I could simply wear a tank top underneath it to make it modest, but that can get a little annoying because a) you are wearing another layer and b) said layer keep going up, so you have to keep pulling it down: yuck :P So what I did was take a piece of black fabric (naturally you would pick whatever color matches your shirt). It was admittedly a bit larger than I needed, but this was a scrap and you trim it down later anyways.


So, I could have just hemmed the top or finished it some other easy way, but the shirt was kind of dressy, so I wanted the top of the piece to be a bit fancier. This could be easily done with some lace, but I had some sparkly netting type stuff, so I cut a 1 1/2" strip of it.


Then I folded the edges to the middle.


And folded it in half over the top of my piece of black fabric and sewed right along the edge.


Next, you need to try on the shirt and pin the top sides of the fabric to the shirt and also pin at the bottom of the 'v.'


 And sew along the edge of the two sides, so the fabric is securely attatched. Then trim away the excess fabric (it really is easier to do it this way than to have a perfectly trimmed piece) and finish the edges so they don't fray when you wash the shirt.


 Believe it or not, that's it - your neckline is fixed without having to wear another shirt in only a few minutes!!

Monday, May 14, 2012

Fixing a Formal Spaghetti Strap/ Strapless Dress


Making a Formal Dress Modest  - sound like a familiar problem? Anyone could look at a dress like this and instantly see that it needs help. Usually, one just throws on a short jacket/balero type thing and for some dresses that works just fine - but a lot of them have an additional problem that can't be solved by a normal little jacket: they are way too low cut - front and back. Such was this dress(courtesy of the local thrift store :) ). So, this is what I decided to do - it will take a little bit more sewing than a normal one, but if you take your time, it'll be fine - it's the same basic idea as fixing the casual strapless dress, only you make the 'shirt' that goes under.


First off you need to pick a sewing pattern (Tip: only buy them on sale, if you wait for a sale at a place like Joanns, you can get them for only a dollar or two) that's fairly simple - after all, you are only going be seeing the very top the bodice (fancy word for the top part of a dress). Cut the pattern out in your size (being that the pattern comes with such detailed instructions and they vary a bit, I'm only going to touch on the basic of how to put this together, not on the mechanics of making the bodice), pin the pieces to your fabric (which needs to be matching in color and type of fabric) and cut them all out. Then pick a color thread that goes well with the fabric.


Then you are just going to go through and sew the bodice together following the instructions your pattern has. I had to sew my side fronts (all of your pattern pieces have their name on them, so don't stress over trying to keep them straight, or what they mean, although most of the time it's pretty obvious) to the center front.


With all of my seams, I went back and did a tight zig-zag along the edge and trimmed the excess fabric, so that the bodice would hold up better.


Continued by sewing the front sleeve and back sleeve together (if you have a weird sleeve like this - most are nice enough to only be one piece - you can do what I do, mark the front one by sticking a pin it it).


Then hemming the sleeve, which is done by marking the sleeve (on the back of course, I would recommend a pencil, so you won't see it on the other side), folding the edge up to the mark and ironing it, and then folding it over again and sewing it.


Continued by sewing the front and back together, then the sleeve into the armhole opening, sewing the 'yoke' (yes, the actually call it that - it's just a band along the top of the bodice) on and so on and so forth - won't get too detailed as you will have all of this information in your pattern.


 Then, once you have the bodice put together - but with no zipper/hook&eye/velcro in the back - you are going to try it on and try your dress on over it. Pin the dress to the bodice and sew along the top of the dress. Then trim all the extra part of the bodice that you are never going to see because it's covered with the dress, sew on some hook and eyes or some velcro to keep the back together - and there you have it! Oh, and have fun picking out your fabric and pattern, I did mine rather basic, just to give you the idea, but there are soooo many different patterns and fabrics out there!!

Monday, April 30, 2012

Quick Fix for a Casual Spaghetti Strap Dress


Alright everyone, I would like you to meet my cousin. She had found this dress at the thrift store, but, as you can see, it was not exactly modest :) Anyways, here is what we did to fix it. First we cut off the straps.


Then stitched down the back where the zipper was (which means this works a whole lot better if your dress is a bit big on you) and cut that off.

Our next step was to take a regular t-shirt (no point in getting an elaborate one really as you're only going to see a little bit of it). You try the t-shirt on, mark where the dress needs to sit, pin the two together


and stitch along the top of the dress. Then because you don't want the t-shirt to unravel you need to zig-zag over the stitch you just made (I used the zig-zag stitch to attach some cute trim, but forgot to take a pic of that... however, you can see the trim in the finished project).


Then cut off all of the un-needed part of the t-shirt - no point in having more layers than you have too.


And here we have the finished product :)


Here's another variation on the same idea. I had this strapless dress that was simply too short, but I thought it would make a cute shirt.


I sewed it to a white t-shirt. Figured how long I needed to keep it and cut the rest off.

Then I hemmed the bottom - by evenly folding up the bottom once, fold it over again and sew along the bottom.


And here that is.